Why Smart Thermostat Wiring Matters for Your Home
Smart thermostat wiring is the key to lower energy bills, remote climate control, and a more comfortable home. By upgrading, you can join millions of homeowners saving up to 23% on yearly heating and cooling costs. But first, you must connect your new device to your HVAC system safely and correctly.
Quick Answer: Core Smart Thermostat Wiring Basics
- Turn off power at your circuit breaker before touching any wires
- Identify your wires by terminal letter (R, C, Y, G, W), not by color
- Check for a C-wire (common wire) – most smart thermostats need it for power
- Match each wire from your old thermostat to the correct terminal on the new one
- Test the system after installation to confirm heating, cooling, and fan all work
Most homes have a 5-wire setup: R (power), C (common/neutral), Y (cooling), G (fan), and W (heating). Heat pump systems swap the W wire for an O/B wire (reversing valve) and may add an AUX wire for backup heat. If your system is missing a C-wire, you’ll need an adapter, a spare wire, or a 24V transformer to power your smart thermostat reliably.
Why This Guide Exists
While smart thermostats promise convenience and savings, the wiring process can be intimidating. A single mistake can leave you without heat on a cold Ohio night or even damage your HVAC equipment. This guide removes the guesswork, showing you which wire goes where, how to handle common issues like a missing C-wire, and when to call a pro.
I’m Aaron from Buckeye Electrical Solutions. I’ve led over 60 permitted electrical projects in Northeast Ohio, including many smart thermostat upgrades. Whether you’re a confident DIYer or prefer a licensed electrician, this guide covers what’s involved in a safe, successful installation.
, a visual comparison of a 5-wire conventional system versus a heat pump system with O/B and AUX wires, and a quick decision tree for what to do if you don't have a C-wire (adapter, spare wire, or call a pro) - Smart thermostat wiring infographic")
Introduction: Upgrade Your Comfort and Efficiency
The smart thermostat is often the heart of a smart home. Beyond remote control, it offers significant energy savings for a greener home and lower bills. It’s about making your home more efficient, valuable, and integrated into your smart ecosystem.
Imagine adjusting the temperature from your Cleveland office or letting the thermostat learn your preferences to optimize for comfort and savings. These features make smart thermostats a powerful upgrade. At Buckeye Electrical Solutions, we aim to empower you to undertake this upgrade confidently or to offer our expertise if you prefer professional installation.

Before You Begin: Prep for a Smooth Installation
Before diving into smart thermostat wiring, proper preparation is key to ensure safety, confirm system compatibility, and gather the right tools.
Check Your System’s Compatibility
Most smart thermostats are designed for low-voltage (24V) systems. Connecting one to a high-voltage system (120V or 240V), like those for electric baseboard heaters, is dangerous and can damage your equipment.
If your thermostat has thick wires with wire nuts or is labeled “line voltage,” it’s likely a high-voltage system incompatible with standard smart thermostats. Similarly, some proprietary HVAC systems use “communicating thermostats” that require specific branded models, not universal smart ones.
Before you buy, always use the manufacturer’s compatibility checker, like this one from Honeywell Home, to ensure it works with your HVAC setup. If you’re unsure about your system type, we recommend a professional assessment. Our team at Buckeye Electrical Solutions can determine compatibility and recommend the best course of action. For more information, explore our Residential Electrical Services.
Safety and Tools
Safety is the top priority. The most critical step is to turn off the power to your HVAC system at the circuit breaker to prevent shock and equipment damage. Find the breaker for your HVAC system in your electrical panel and flip it to the “off” position. Confirm the power is off by checking your old thermostat; it should be blank and unresponsive.
This DIY task is no exception to the proper electrical procedures outlined in the National Electrical Code (NEC).
Here’s a list of typical tools you’ll need for smart thermostat installation:
- Phillips and flathead screwdrivers: For removing the old thermostat and mounting the new baseplate.
- Wire stripper: If you need to expose more copper on your existing wires.
- Needle-nose pliers: Useful for gently manipulating wires.
- Small level: Many new thermostats have one built-in, but a separate one helps ensure a straight mount.
- Drill: With appropriate drill bits for wall anchors, if needed.
- Smartphone: For taking pictures of your old wiring and for using the smart thermostat’s setup app.
- Wire labels: Most smart thermostats come with these, but masking tape and a pen work just as well.
Decoding Your Smart Thermostat Wiring
Understanding your thermostat wires is simpler than it looks. The golden rule is: identify wires by their terminal letter, not their color. Color codes are not universal and can vary.
Your thermostat’s wiring sends signals to your HVAC system. Each wire connects to a terminal labeled with a letter indicating its function. Understanding these labels is critical for successful smart thermostat wiring.
Common Thermostat Wires and Their Functions
Here’s a breakdown of the most common thermostat wires and what they do:
- R Wire (Power): Typically red, this is the 24V AC power wire from the HVAC transformer. You may see
R,RH(Red Heat), orRC(Red Cool).- Jumper wires: Many older systems use a jumper to connect RC and RH. Most smart thermostats handle this internally, so you can remove the jumper. If you have separate RH and RC wires, connect them to their matching terminals.
- C-wire (Common): Often black or blue, this completes the circuit to provide continuous 24V power to your thermostat. It’s vital for powering a smart thermostat’s Wi-Fi and screen. Without it, thermostats may “power steal,” causing instability or damage.
- G Wire (Fan): Typically green, this wire controls the HVAC system’s fan (blower).
- Y Wire (Cooling): Usually yellow, this wire activates the air conditioner’s compressor. You may see
Y1andY2for multi-stage systems. - W Wire (Heating): Commonly white, this activates your conventional heating system (furnace). You may see
W1,W2,AUX, orEfor multi-stage or heat pump systems. - O/B Wire (Heat Pump Reversing Valve): Orange or blue, this wire is for heat pumps. It controls the reversing valve to switch between heating and cooling. (
Ois often for cooling,Bfor heating).
Understanding Common Smart Thermostat Wiring Configurations
The number of wires depends on your HVAC system’s complexity. Here are common configurations:
- 2-Wire System: Usually a heat-only system with
RandWwires. A smart thermostat will likely need a C-wire adapter or be battery-powered. - 4-Wire System: Basic heating and cooling with
R,W,Y, andGwires. It lacks a C-wire, so you’ll need an adapter for a smart thermostat. - 5-Wire System: Ideal for smart thermostats, this common setup for conventional systems includes the
Cwire (R,C,W,Y,G). - Heat Pump Systems: These systems have more wires for the reversing valve and backup heat, typically
R,C,Y,G,O/B, and sometimesAUXorE.
Here’s a comparison to help visualize the differences:
| Terminal | Conventional HVAC System (e.g., Gas Furnace + AC) | Heat Pump System (with Aux/Emergency Heat) | Function |
|---|---|---|---|
| R | R or RH/RC (Power) | R or RH/RC (Power) | 24V Power |
| C | C (Common) | C (Common) | Continuous 24V Power (for smart thermostat) |
| Y | Y (Cooling) | Y (Compressor) | Activates cooling or compressor |
| G | G (Fan) | G (Fan) | Activates fan/blower |
| W | W (Heating) | AUX (Auxiliary Heat) / E (Emergency Heat) | Activates conventional heat or backup heat |
| O/B | N/A | O/B (Reversing Valve) | Switches heat pump between heating and cooling |
What If I Don’t Have a C-Wire?
This is the most common challenge in smart thermostat wiring. The C-wire is essential for powering a smart thermostat’s advanced features. If you don’t have one, you have several options:
- Check for a Spare Wire: Check for an unused wire tucked in the wall behind your thermostat. If you find one, connect it to the
Cterminal on your new thermostat and theCterminal on your HVAC control board. - Use a C-Wire Adapter Kit (PEK): Most manufacturers (Ecobee, Google, Honeywell) offer C-wire adapter kits. These use your existing wires to create a C-wire connection without losing fan control. Follow the kit’s instructions. Third-party “add-a-wire” adapters are also available.
- Repurpose the G-wire: You can repurpose the G-wire as a C-wire by moving it to the
Cterminal on both the thermostat and HVAC board. However, this disables independent fan control (fan-only mode). - Install a 24V External Transformer: A 24V external transformer plugs into a wall outlet and runs a wire to your thermostat to provide power. This is effective but leaves a visible wire on your wall.
- Hire a Professional: If you’re uncomfortable with these options, calling a professional is the safest bet. Our electricians at Buckeye Electrical Solutions can install a C-wire solution safely and correctly.
Step-by-Step Installation Guide
Now that you’ve prepped, it’s time for the physical installation. Follow these steps for a seamless transition.
Step 1: Remove Your Old Thermostat
- Turn Off Power: We can’t stress this enough. Double-check that the HVAC system’s breaker is OFF.
- Remove Faceplate: Gently remove the old thermostat’s faceplate to expose the wiring.
- Photograph Wiring: Take a clear photo of the current wiring. Make sure the terminal letters for each wire are visible. This photo is your guide.
- Label Wires: Use the included labels or masking tape to label each wire with its corresponding terminal letter (not color).
Step 2: Mount the New Smart Thermostat Base
- Disconnect and Remove: After labeling, disconnect the wires and unscrew the old baseplate. Prevent wires from falling into the wall by wrapping them around a pencil.
- Thread Wires: Thread the labeled wires through the opening in the new thermostat’s baseplate.
- Mount New Base: Position the new baseplate, using the built-in level if available. Mark and drill holes for wall anchors if needed, then screw the base securely to the wall. Use the included trim plate to cover any old marks.
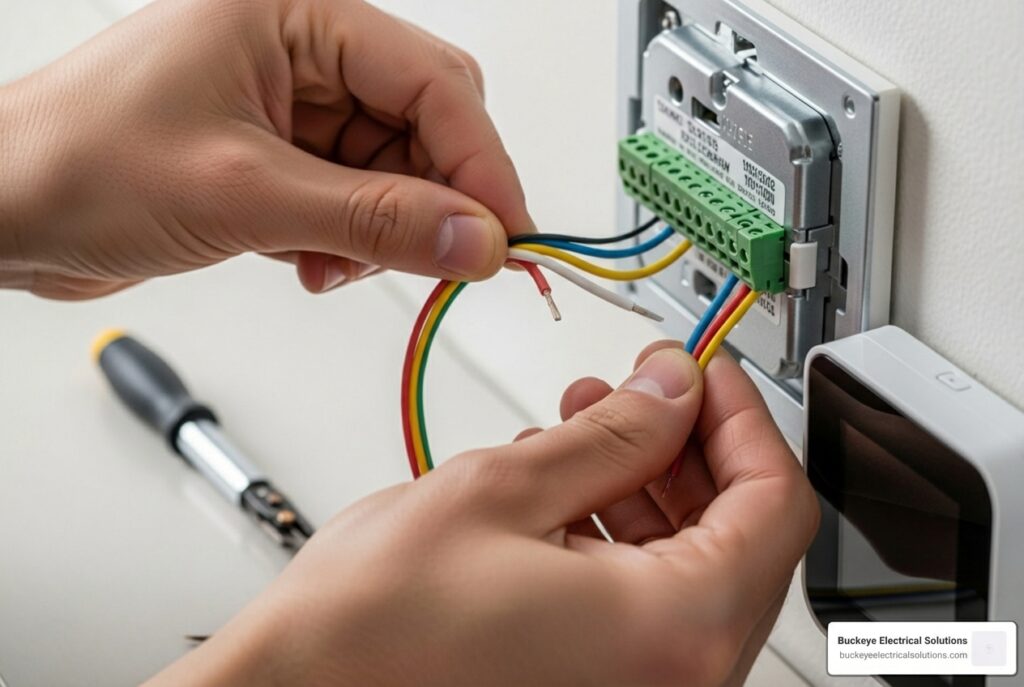
Step 3: Connect the Wires
- Match Wires to Terminals: Using your photo as a guide, connect each labeled wire to the matching terminal on the new baseplate.
- Secure Wires: Insert each wire into its terminal. For push-in terminals, press the lever, insert the wire, and release. For screw terminals, tighten the screw firmly. Gently tug each wire to confirm it’s secure.
- Handle Jumpers: If your old thermostat had a jumper between
RHandRC, check the new thermostat’s manual. Most don’t need it. If you have oneRwire, connect it to theRterminal as instructed. - Connect C-wire: Connect the C-wire to the
Cterminal. If using an adapter, follow its specific instructions. - Handle Extra Wires: If you have unused wires, cap them individually with electrical tape and ensure they don’t touch any terminals.
Step 4: Power On and Configure
- Attach Faceplate: Align and snap the new thermostat’s display onto the baseplate.
- Restore Power: Flip the HVAC circuit breaker back to the “on” position.
- Configure Thermostat: Your thermostat should power on and guide you through setup. This usually includes:
- Connecting to your home’s Wi-Fi.
- Downloading the manufacturer’s app and creating an account.
- Confirming your HVAC system type (e.g., conventional, heat pump). This is crucial for proper function.
- Setting temperature preferences and schedules.
Troubleshooting and Final Steps
After installation, it’s time to test your system. If issues arise, here are some common problems and solutions.
Troubleshooting Common Smart Thermostat Wiring Issues
If your system isn’t working correctly, check the following:
- No Power to Thermostat:
- Check the breaker: Ensure the HVAC breaker is on.
- Check the C-wire: A loose C-wire connection at the thermostat or HVAC board is a common cause of power issues.
- Check the HVAC panel: A safety switch may prevent power if the HVAC access panel isn’t closed securely.
- Check the fuse: A wiring mistake may have blown the 3A or 5A fuse on your HVAC control board.
- HVAC System Not Responding (No Heat/Cool/Fan):
- Check wiring: Re-check all wire connections against your photo and the thermostat diagram.
- Check settings: Ensure you selected the correct HVAC system type during setup.
- Check mode: Make sure the thermostat is in the correct mode (Heat, Cool, etc.).
- Short Cycling (HVAC turns on and off too frequently):
- Check placement: Ensure the thermostat isn’t near drafts, direct sunlight, or heat sources.
- Check advanced settings: Review the “staging” or “differential” settings in the advanced menu.
- Incorrect Temperature Readings:
- Placement: Again, check for drafts or heat sources affecting the sensor.
- Calibration: Check if your thermostat allows for temperature calibration in its settings.
A simple thermostat reset or cycling power at the breaker can often resolve minor glitches.
When to Call a Professional
While many installations are DIY-friendly, some scenarios require an expert. At Buckeye Electrical Solutions, we handle complex smart thermostat wiring regularly for homeowners across Northeast Ohio. You should consider calling us if:
- You have complex wiring (more than 5-6 wires) or non-standard labels.
- You have a dual-fuel system (heat pump with a furnace).
- You have a line voltage system (120V/240V).
- You’re uncomfortable with the process. There’s no shame in calling a pro for a job that carries electrical risks and is essential to your home’s comfort.
Don’t hesitate to reach out to our team at Buckeye Electrical Solutions. We’re here to provide peace of mind and expert service. Contact Us for professional help with your smart thermostat installation.
Frequently Asked Questions about Smart Thermostat Wiring
Here are answers to common questions about smart thermostat upgrades:
What is a C-wire and is it always necessary?
A C-wire, or “common wire,” provides continuous 24V power to your thermostat. It’s crucial for features like Wi-Fi and touchscreens. While some thermostats can work without one by “power stealing,” this can cause instability. A C-wire is highly recommended for reliable performance. If you don’t have one, you can use a C-wire adapter or an external transformer.
Can I use the wire colors to identify their function?
No. While a common color code exists, it’s not a mandatory standard and can vary. The cardinal rule of smart thermostat wiring is to always identify wires by the terminal letter on your old thermostat, not by color. Always take a picture of your old wiring before disconnecting anything.
My new thermostat isn’t turning on. What did I do wrong?
This is a common issue with several potential causes:
- The breaker is off: Ensure the HVAC breaker is switched on.
- Incorrect C-wire connection: The C-wire must be secure at both the thermostat and the HVAC control board.
- Loose wires: Gently tug each wire to confirm it’s securely seated in its terminal.
- HVAC panel is open: A safety switch may prevent power if the furnace or air handler cover isn’t closed securely.
- Blown HVAC fuse: A wiring mistake can blow the low-voltage fuse (often 3A or 5A) on the HVAC control board.
Wire with Confidence or Call the Experts
Upgrading to a smart thermostat is an impactful home improvement, offering significant energy savings and convenience. Understanding smart thermostat wiring helps you tackle this project confidently. Whether you DIY or hire a pro, the benefits are well worth it.
For those in Northeast Ohio, Buckeye Electrical Solutions is here to help. Our licensed electricians are experts in all residential electrical services, including smart thermostat installation. We’ll ensure your system is wired correctly and safely for optimal performance.
Don’t let wiring complexities stand between you and a more comfortable, energy-efficient home. Explore our expert electrical services and let us help you wire up your world.